To check the status of the bridge, press and hold the 'MINUS' and 'PLUS' buttons at the same time for 3 seconds, to enter pairing mode: the display will show [PAIRING MODE] for a second then show [MAIN SENSOR].
Press 'PLUS' a few times to get to [BRIDGE]. If the unit is paired it will show [CONN] and the signal strength will be shown by the signal strength icon at the top left of the display. The signal strength icon will be flashing if it is out of range: move the display closer to the bridge until you get a signal.
If the bridge needs pairing the display will show [NONE].
If the display reads [CONN] and you wish to unpair and re-pair, press and hold the centre button until the display reads [NONE]
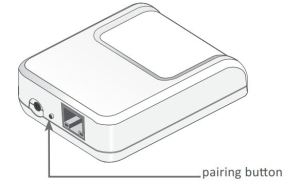
To pair the bridge, ensure the display is showing [NONE]. Turn the bridge off at the wall socket, press and hold the button on the back of the internet bridge and continue to hold it whilst switching the power on at the wall. Keep the button held in until the light comes on, then let go. The display will change to [CONN].

If you are still not seeing the cloud icon on the top left hand corner of display follow the reset procedure below and then try the pairing steps again.
To reset, turn off your display and hold down all three buttons on the front and power it back on at the same time while pressing down on all three buttons.
Display will read [RESET DATA] press the 'MINUS' button for "no" and 'PLUS' button for "yes".
The display will then ask if you wish to [RESET DEVICE]
Once you have completed the reset, follow the pairing steps again to check if the cloud icon appears.
